Taking Photographs

Michelle

One picture can say a thousand words…
but it can take a thousand attempts to get one picture.

Whether you are using a mobile phone, tablet, small camera or a big DSLR camera, the simple rules for photography are the same. Read through the following hints to help you take great photos that really tell a story for your book.

Taking photos for your story

  • Write your story first, then source your photos… it is much easier to match the photos to the story than the other way around.
  • Make sure you have permission to use the photos you take, especially if there is more than just your subject in the photo.
  • Capture different features of your subject in different poses, scenarios or environments. This provides the most interest for your story.

Post-hints6-perspective

  • Take photos of things your subject uses, without the subject in the photo. We don’t need to see the same person in every shot.
  • If you are talking about someone’s hands-on approach to what they do, you might like to take a photo of their hands only (see photo on right).
  • Move your body and/or the camera around. Photos can be in portrait view (tall) or landscape (long). Change the angle of where you take your photo from – it might be good to squat or lay down on the ground, or you might like to get up high so that you are looking down on your subject.

Framing your photo

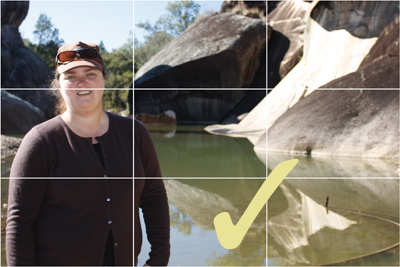
In the photography world this is something called the rule of thirds. Imagine your picture is broken up into 9 boxes (3 across and 3 down – see the photos below). 

It is advised that you think about the following tips when framing your photo.

  • Keep the horizon on one of the lines, so that 2 thirds of your photo is either sky or ground (whatever is most interesting).
  • Your subject should take up 1 third of the frame and the remaining two thirds can be background or something else of interest.
  • It is good to have a focal point in the photo, whether it be your subject, or something else like a piece of equipment or a wandering path (see example below).
  • It is often recommended not to place your subject in the very centre of the frame, so having them stand to the side provides a good balance.

Don’t feel bad about not framing your photo perfectly; our designer can correct this during the publishing stage.

hint6-01

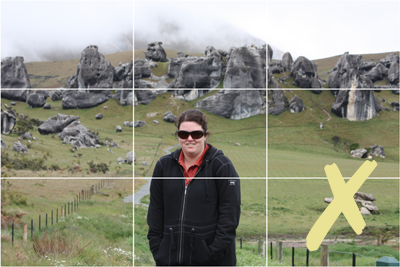
This photo has the subject in the direct centre of the photo. Your eyes focus directly on the individual and not on the interesting background.

hint6-02

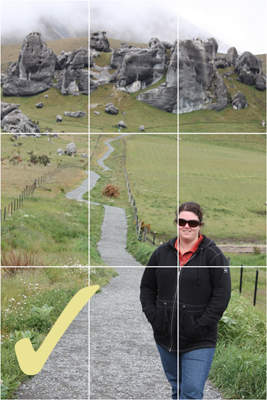
This photo is framed much better. You have the subject moved to the side, the camera is in portrait (tall) view and your eyes tend to look at the path that leads up the hill to the rocky outcrop above.

hint6-05

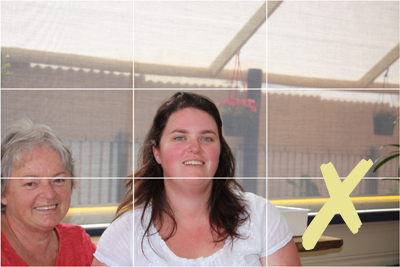
This photo was not very well framed – it is just showing the heads of the individuals, there is lots of background and the person on the left is cut off a little.

hint6-06

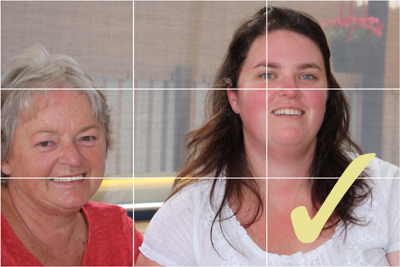
This photo can be made into a well framed photo by cutting out the background and focussing on the individuals.

Taking a good portrait

  • As mentioned above, framing your subject is important. Think about how they are standing, what else is in the photo that you want to capture and where the subject is looking.
  • Don’t take a photo of just the head of the person, as it shows no context to the surroundings. Try and take a photo that includes the shoulders and chest (i.e. take a look at your school photo).
  • Sometimes we want the person to look directly at us so that we can capture their eyes, other times we might want the person looking away towards something of interest. Take different photos and pick the right one for your story.

hint6-07

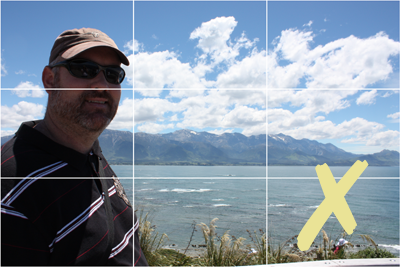
Although the person is filling up 1/3 of the photo as recommended, there is shadow over the face and you can only see the head of the person.

hint6-08

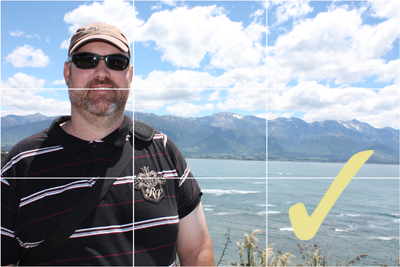
The person is still filling up 1/3 of the photo, but the face is easier to see and you can see how and where the person is standing.

Taking photos inside

  • We often don’t have enough light inside and require a flash to help us. This is okay if the light is very dim.
  • If you can, turn some lights on inside, or stand near a window to get natural light. Natural light is a photographer’s best asset.

Taking photos outside

  • Try and take photos on an overcast day, this reduces the glare and the harsh shadows. However, this is not always possible.
  • Try to place your subject in dappled light or shade, such as under a tree, as this helps reduce glare and provides a nice backdrop to your photo
  • Use your camera’s flash to help bring light onto the face. When your subject is wearing a hat, there can be lots of shade that is cast across the face and eyes. The flash can help reduce this.

hint6-03

Bright, sunny position without the use of fill-in flash – the face is shaded too much by the hat.

hint6-04

Bright, sunny position using the fill-in flash – you can see the face under the shade of the hat.

Disclaimer: PeeKdesigns and the sponsor(s) retain the right to use any illustrations and photographs entered in the program for ongoing non-commercial promotional and educational purposes in any media without notice and without any fee paid to the entrant. It is the responsibility of the entrant to ensure that all illustrations and photographs submitted have relevant permission to publish, and its use by PeeKdesigns and the sponsor(s) will not be in breach of any third party intellectual property rights.